Thursday, 25 July 2013

New Shed Lights with removable roof...

After my 3 days in hospital, I was soon in my favorite place 'The Den' and back to the lights I started.
              I opted for white led's as I am getting a tad bored with yellow (or my eyes are getting worse?)  Any way Patience being the most important attribute to modelling (just my opinion?) I played around with a few idea's and did not want wire, led's and resistors all hanging around like spaghetti so I used bread board, I believe that's what it's called, 20 thou plastic sheet with a 60 thou strip added to give it support  I wanted a minimum of wiring showing when the roof is off, and I believe that was accomplished by 20 thou pretty much hiding over 90% of it all. The outside lamps are simple shaped and fed through and soldered to the bread board and a spot of super glue just for good measure.
             When all is working a quick spray of matt black and that pretty much hides the wires to the outside lamps.
By the way they are running a 9 volts dc.

 Because of the light and conduits I had to make some (on the job) modifications to the removable roof supports.
I included this shot because I quite like it.

 You can see the flues for the smoke.

 Just so you can see the loco name .Wheldale.
Just a slight long shot. Next is to fit the glazing and construct a building of sorts to disguise the power socket to the lights. and possibly some weathering ti the roof. Oh and of course I have to make some drain pipes...

Thursday, 18 July 2013

New Shed Removable Roof

Kit bashing coming along nicely...
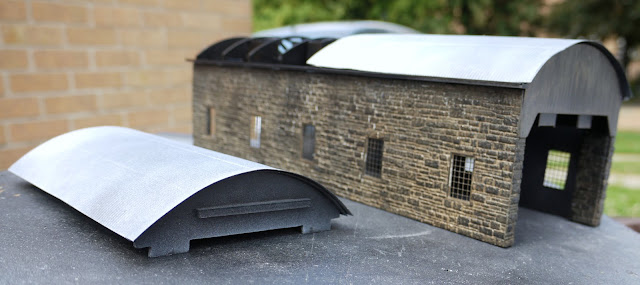
Removable roof and home made gutters.

One roof part removed.

Second roof part removed.

Roof sections showing the roof supports.

 This view shows the home made gutters, which have to sturdy given the removable roof.

Tuesday, 16 July 2013

New Shed Upd8

Well a little more work done on the shed, mainly floor boarding between and either side of the track (we don't want anyone tripping over sleepers in the dark?). If it were too symmetrical it would not look real...That's my excuse and I'm sticking too it! The color is formed with matt black and after a minute or so just wipe off with kitchen roll leaving the detail showing.
 The Stone work.
                      Basically two colors.... Woodlands scenic Stone Gray C1218 brushing all over taking care to not totally obliterating  the white mortar then after a spray with Matt varnish, I mix the Stone Gray and Humbrol Matt black to make variable shade of stone, Then a spay of Matt vanish again. when dry I use Matt black and a stiff  bush to give the soot effect.
A view from above, This was my vision of a removable roof to see the loco's inside 
(worth it Me thinks?)
This is the view that makes it all worth while?

Friday, 12 July 2013

New Shed

A couple of years ago at a toy and train fair I picked up a Peco Carriage Shed for £9 from a rummage box. And gleaning ideas from Ben Alders layout 'Far North' here is my transition...
This is how it was before I started.
The new track laid...
 Connected to the turntable...
Just checking...Hows that for size?
Taking shape...
Smoke ducts made as I intend to add lighting inside and out...
Plenty more work to do...
Watch This Space...


Thursday, 4 July 2013

J94 Number 14 and a new project.

Well I have not finished yet, Here is number 14, Brand new courtesy of Fleabay. I could not resist. All it needs is a decoder and it can take it's place with the rest....I checked it out on the Hornby collectors guide and it was produced in 1999...Nice one!

Below is a new little project, As I have a little ply wood spare and some spars I decided to make a little 'Shunting Fan' it measures 41" x 16" and may? have a small fiddle.
               The warehouse was scratch built about 5 years ago and and a shame not to use it. Plus it will give me inspiration to do some more industrial type buildings.
               The track is all hand built copper clad SMP bullhead rail. There is going to be a low bridge and a banking.........Watch this space!